Keg couplers are available in various styles and types, such as Sanke D, S, G, A, and U systems, but they all operate on similar principles to deliver reliable draft beer pours. Regular cleaning of your keg coupler is essential for hygiene and performance, but equally important is lubricating the O-rings and seals before putting it back into use. This prevents leaks and extends the life of your equipment. In the United States, the Sanke D coupler remains the most widely used option for homebrewers and commercial setups alike. The following photos, tips, and procedures in this keg coupler maintenance guide will primarily focus on the Sanke D model to help you troubleshoot and care for your draft beer system effectively.
How to Hook Up a Keg Coupler to Your Beer Keg
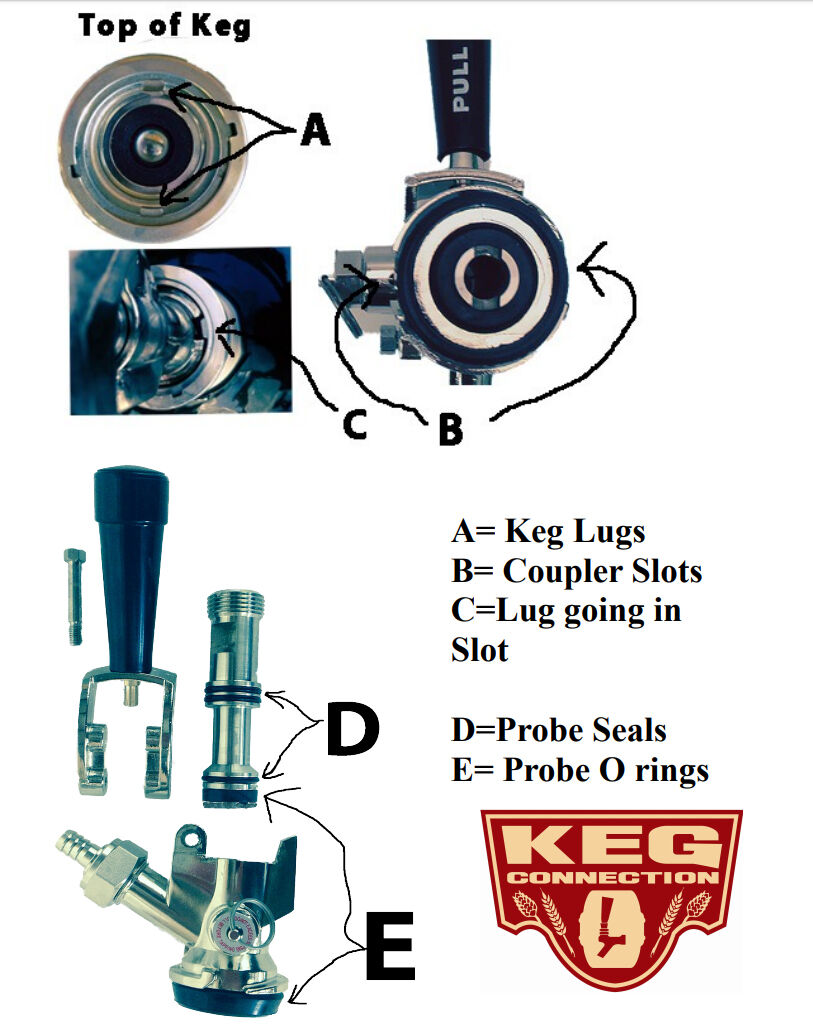
Connecting your keg coupler is straightforward and quick. Start by ensuring the handle is in the upright position. Align the coupler with the two lugs on the keg (marked as “A” in the reference photo below) and match them to the two slots in the coupler (marked as “B”). Press the coupler down firmly, then rotate it clockwise to the right until it stops completely—this full twist is crucial to avoid any potential gas or beer leaks. Finally, pull the handle outward and push it down until it securely locks into place. Proper alignment ensures a tight seal for optimal draft beer flow.
How to Clean Your Keg Coupler Properly
Cleaning your keg coupler doesn't require fancy tools or chemicals. Simply use hot soapy water to scrub away residue, followed by a thorough rinse with clean water to remove any soap traces. Always follow up with lubrication after cleaning, as dry O-rings can lead to frustrating leaks in your draft beer setup. This simple routine keeps your keg coupler hygienic and ready for the next pour.
How to Lubricate a Keg Coupler for Leak-Free Performance
Keg couplers feature several O-rings and seals that need regular attention to maintain a tight seal. On the bottom of the coupler, you'll find two seals: one on the main body and another on the probe (see reference E in the images). Apply a thin layer of food-grade O-ring lubricant to these areas for smooth operation. The probe itself has two or three O-rings, depending on the manufacturer (as shown in reference D). To access them, unscrew the long nut that secures the handle, remove the handle from the side opposite the coupler, and gently pull the probe upward out of the body. Lightly lubricate these O-rings, then reassemble the probe. This keg coupler lubrication step is key to preventing wear and ensuring your homebrew or commercial keg system functions without interruptions.
Troubleshooting Keg Coupler Leaks from the Bottom or Top of the Probe
If you've followed the cleaning and lubrication steps but still notice air or beer leaking from where the coupler meets the keg or from the top of the probe, check for external factors. Is a hose tugging on the coupler, or is something pressing against it? These can misalign the coupler and cause persistent leaks in your draft beer lines. Ensure nothing is interfering with the coupler's position for a secure, leak-free connection.
Fixing Leaks Where Hoses Connect to the Keg Coupler
Leaks at the hose connections often stem from loose fittings. Double-check that your beer nuts are tightened securely, and confirm there's a washer inside the coupler (in some models, the one-way rubber valve, known as a duckbill valve, serves as this seal). Tightening these components can quickly resolve gas or beer escapes in your keg setup.
When the Keg Itself Causes Coupler Leaks
Sometimes, the issue isn't with the coupler but the keg. Inspect the large rubber washer where the coupler attaches—if it's torn, cracked, or damaged, it could be the culprit behind your leaks. Also, look for any bends in the metal fitting that might disrupt the seal. In these cases, reach out to the keg supplier for a replacement or repair. If you're still stumped on your keg coupler troubleshooting, drop us an email — we're here to help get your draft beer system back on track.